Wednesday, July 30, 2014

Poor Mans Crab Cakes (Zucchini Cakes)


I can hardly wait until the time of year that my table is lined with fresh, green garden zucchinis. They are so easy to grow and so abundant! I cook with them just about every day while they are in season and I bake breads and freeze what I can't use up. Here's a classic recipe that gets busted out and used hard each summer here on the homestead.

 Zucchini cakes (or around here they are better known as Poor Mans crab cakes.) 

They are very, very easy to make, cost less than a dollar and take less then 5 minutes! Make sure to tuck this one away in your recipe box...

It's this simple....

2 cups shredded zucchini
1 cup breadcrumbs
1 tbls. Mayo
1 heaping tsp. old bay seasoning (seafood seasoning for those who don't know what that is)
2 eggs. 

Start by shredding the zucchini with a cheese greater.


Mix all of ingredients together


Form patties and fry in butter until golden brown on both sides


After just a few minutes you will have this divine tasting food ready to eat!


This is especially delicious with my salmon cake sauce.

 For that I use sour cream, mayo and lots of hot sauce with dill and minced onion- all amounts are just added "to taste". It's out of this world good!!

Quick, cheap and easy....That's my kind of summer menu. Try them in a Sandwich to make it the star of the show or have it as an appetizer or side dish. You really can't go wrong with these!

Thursday, May 8, 2014

Hot Bacon Dressing for serving over wilted greens...In this case, Dandelion!


This is one of my Mom's specialties. She serves it every holiday over endive and people go crazy for it. This spring I decided to find ways to use the millions of dandelion in my yard and this is one of my favorites!


The first step is to gather your greens. My homestead helpers (3 daughters) helped me pick the dandelions by popping them off at the root. You can dig them all up and use the root for other things but we didn't do that this time. It's best to pick the greens before they flower to reduce the risk of them being bitter. Some of ours had blooms but they were still yummy.

Clean them really well. I pick all the leaves and then soak them in my sink.


Next wilt the greens by steaming them. 


They are now ready to be awesome-fied by  Hot Bacon Dressing. Set greens aside and make dressing as follows:

Here's what you need:
1 lb-1 1/2 lb bacon
1 cup sugar
1 tbls flour
2 eggs
1/2 c. white or cider vinegar
1/2 cup water
1 or two hard boiled eggs.
1 large, heaping bowlful of any steamed greens you like.


Method:
(Steam greens set aside)

Next: Fry bacon over med. high heat. (Did you guess that this bacon came from our back yard? If you did, you'd be right!)


While bacon cooks mix together: 
1 cup Sugar
1 tbls. flour

Add to sugar and flour:
 2 eggs
1/2 cup cider vinegar
1/2 cup water


remove bacon from grease and crumple. pour out MOST of bacon grease but not all of it. 

Pour sugar/vinegar mixture into hot bacon pan and stir like crazy until it thickens and is not foaming.  Add crumpled bacon back in.


Stir greens into hot dressing and serve with sliced hard boiled eggs over the top.


(Okay...I realize the picture does NOT make it look that appetizing BUT in my defense I was craving it so badly I almost didn't take pictures at all. My eggs were not nearly cool enough to slice..but you get the point, right?)

People either love this recipe or they hate it. Let me know how you feel after you try it!


Monday, April 28, 2014

Very Easy Dandelion Fritters


Dandelions have arrived!!


I've been patiently (Okay, Not so patiently) waiting for my garden to be in full swing this year. There is something wonderful about eating food from your own back yard.

We're right around the corner from asparagus and strawberry season but I can't even wait that long. As I sat on my back porch this morning drinking coffee and dreaming about my summer gardens, it dawned on me that I had a delicious spring harvest all around me! Ahhhhh...Dandelions!

Lila and I got to work foraging a big bowl full of them while Daisy played with the younger kids. About 15 minutes later we had a heaping bowl full of stems and flowers. (We could have dug the roots for coffee and medicinal purposes but we chose to skip that for today)    

The first step to using dandelions is to get them cleaned and ready. First I pop off all of the clean looking  flowers and set aside.


Next, I put them all in the sink and start rinsing and picking off the leaves.

I let the picked greens soak in cold water for a bit and then rinse them one more time in a colander.


At this point the leaves are ready to be cooked in a recipe or simply thrown in salads. I'm going to cook mine with Pa Dutch Hot Bacon Dressing. 


Now to the fritter recipe...

If you picked your dandelions from a pesticide (and dog pee) free area and they look clean, I wouldn't even wash them.

Simply heat the oil in a cast iron pan.....

 dip each flower in the batter (recipe below)......


 and drop in hot oil.


After about a minute remove to towel lined plate. Make your favorite dipping sauce to serve along side and Enjoy!


I used a sauce of sour cream, lemon juice, any sweetener of choice and some red pepper flakes.

Even My kids LOVE these "flower fritters"

Go ahead and try this recipe. You'll never look at weeds the same way again.

Dandelion Fritters:

1 cup milk
1 beaten egg
1/2 cup flour
3/4 cups cornmeal, finely or medium ground
1 teaspoon sea salt
Lots of freshly ground pepper
2-4 cups Dandelion flowers
Frying oil of choice- I used sunflower oil.

1)Mix batter ingredients together with fork.

2)Heat oil in skillet

3)Dip each flower (holding stem) in batter mixture and then drop in hot oil

4)Remove when golden brown.

Thursday, January 2, 2014

My Husbands Hobby


Well it's been about a year since Justin started dabbling in wood crafts and that means about a year that I've been able to ask him to "go build me this" or "go build me that." I've loved just about everything he's created and now that we have a new house on our homestead he has lots of spaces to try to furnish with the lumber that he has milled.

Some of my favorite things he's made for me have been:

 A Pallet wood potting table....


Wood slices, for all my crafting needs...


                                                                     Candle holders....


Blocks for the kids....


This beautiful childrens picnic table...


He and the girls made this birdhouse to surprise me....


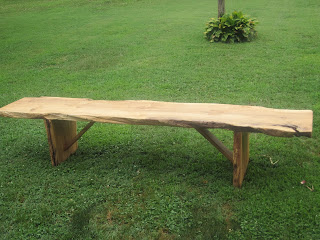
                                                                And a bench or two....


like this rustic little garden bench...


and this very large one.


He made lots of cutting boards too...


A New kitchen table...


A foyer table...


A desk....


And a dining room table.


Whew...That's quite a bit for a beginner (who also happens to work 60+ hours a week and take care of a family and a homestead)  I'm pretty proud of what he can get done in his -not so often- spare time!

I can't wait to see what he'll come up with in 2014.

Let the building begin!


Monday, May 6, 2013

Planting a Homestead Orchard


I'm so excited to finally be planting our fruit trees. I recently set up a stand of homemade products at a local event and decided that I would save all of my profits to be able to buy trees for an orchard. Luckily I had a decent day and the next week we could head to the nursery to pick out our trees.
 
We chose:
 
2 Apple Trees (Needs pollinator)
 
2 Sweet Cherry trees (Needs Pollinator)
 
2 Pear Trees (Needs Pollinator)
 
1 Peach tree (Does NOT need pollinator)
 
1 Nectarine Tree (Does NOT need pollinator)
 
After choosing what fruit you'd like to grow and picking out your trees the next step is mapping out where you'd like to plant them. You don't want them too close or they will crowd and shade each other but they can't be too far apart or they have a lower chance of being pollinated.
After searching online we measured about 25 feet between each tree and 30 feet between the rows. Some of our trees are semi-dwarf. (Because the lady at the nursery told Justin that's what "we" wanted....but I totally wanted full size...These will be easier to manage though)
 
Put some stakes where you'd like to dig your holes....


Next...Find a big strong Man to dig your holes for you. Trust me, It's much easier that way!
 
 See my sweet husband out there digging??


You want your holes to be just as deep and twice as wide as your pots. This allows for the roots to take off quickly and get strong.


Another really important part is to make sure you water them at least twice a week the first year. I've read that it is the most detrimental part of growing fruit trees. 
 
 
Now....When they start to grow, I'll have to learn how to prune them the right way. For now, I'm just enjoying knowing that they are planted and blossoming!!
 
How pretty!!


Do you have fruit trees? Is there any thing I need to know to get loads of fruit from them? I'm just learning as I go so any advice is welcomed!!!
 
Do you want to know the next project I'm saving up for?????     
 
 BEES! To Help pollinate the fruit of course!


Wednesday, April 10, 2013

Fermenting Kimchi

Kimchi is a staple side dish in Korea.
 It is simple to make and it offers your gut a ton of healthy, live bacteria known as lactobacilli.( Trust me...your digestive tract will thank you for getting more of this special bacteria in it)  It also has tons of vitamins A, B and C. I've even  read one study that shows that fermented cabbage can help prevent cancer. Along with all of the fermented benefits of this dish also comes all of the benefits of the red pepper, ginger and garlic which all have healing properties of their own.

I'm so thankful that a friend of mine brought me a plateful of this when she visited the other month. (Not to mention that she even drove back to her house to get me a second serving) This recipe comes from her mother, who is an incredibly special woman to me and I love every food she has ever made. I'm so happy that she shared her recipe with me. (And that she gave me permisiion to share it with all of you!)

We have not been without a jar of this since the day I got the recipe. As soon as it's done fermenting I start a new batch so it's ready to go.I highly recommend making this but be aware that it is spicy. Spicy and delicious!!!


Here's how It's done:

1) Cut up two Napa cabbages in 1-2 inch squares ( I was not using Napa's when I took this picture)


2)  Soak the cabbage in 10 cups of water and one cup of salt for 5-6 hours.


3)  Drain, Rinse and squeeze off excess liquid from cabbage


4) Mix in 1/2 cup red pepper flakes,
5 scallions cut into 1 inch pieces
1 Tbls. sugar
1 Tbls, chopped ginger root
 1 Tbls. chopped garlic.


5) Pack mixture tightly into a CLEAN large glass jar with a lid and let it ferment on your counter top for 3-6 days.


6) When it's done fermenting I put it in smaller quart jars and put it in the fridge.


Enjoy It with everything you ever eat. I love it with eggs...and meat...and grilled cheese sandwiches..... and well you get the point!!!


I've read that it has a shelf life of a few months in the refrigerator since it is fermented , however I would challenge you to have it last more than 2 weeks without being eaten. It is just too delicious!!


Thanks Jane and Nadia for your sharing this with me!


I. Love. It!!!!!


Tuesday, March 26, 2013

Gas stations, Pregnancy Tests and Bathing Suits!

You know that feeling? The one where you plan your day to go one way and it goes in a whole other direction??

Well that was my day yesterday.

It started out just like any other day....thinking about all the papers I had to fill out to get the house finalized, hoping to pressure can some chicken, mommy-ing 3 little girls, knowing that I had to clean out the fridge, and wanting to start some seeds.

And I went to bed feeling.....kind of....well.......pregnant!

WHAT?! how did that happen? We weren't even PLANNING  a baby! We always plan our babies!

Actually for the first time in my adult life...I didn't even want to be pregnant right now-seeing that our 1 year old toddler is a crazy mess most days!

I was just going about my evening, when- BOOM! It dawns on me at around 9pm  that my "friend" hadn't been around for almost 40 days!!

After a call to my sister and a confirmation that it had been waaaay too long since I had my....you know what... We headed up the road. To a gas station. To buy a pregnancy test.

You guessed it! It was positive. and now I get to be pregnant again!

 We are shocked and excited! It didn't all sink in yet but how could I not be happy that I'm going to be able to hold a precious little baby that my husband and I created with love...

 Anndddd......that It's totally cool for me to look fat in a bathing suit this year....Sweet!